Summary
Unlock the Secret to Lifelong Hardwood Floor Beauty with Expert Installation Tips is a comprehensive guide focused on the proper installation, maintenance, and care of hardwood flooring to ensure its durability, aesthetic appeal, and long-term value. Hardwood floors are highly prized in residential and commercial settings for their timeless style, warmth, and ability to increase property value. However, achieving a flawless, long-lasting hardwood floor requires precise installation techniques, careful material selection, and ongoing maintenance practices to avoid common pitfalls such as moisture damage, warping, and premature wear.
The guide covers the two main types of hardwood flooring—solid hardwood and engineered hardwood—highlighting their distinct characteristics, installation requirements, and environmental considerations. Solid hardwood, valued for its authenticity and multiple refinishing opportunities, typically demands nail-down installation on plywood subfloors. Engineered hardwood, featuring a layered construction with a hardwood veneer, offers enhanced stability and versatile installation methods such as glue-down or floating floors, making it suitable for a wider range of subfloor conditions.
Proper preparation before installation is emphasized as critical, including moisture control, acclimation of wood to ambient conditions, subfloor readiness, and layout planning. Installation methods vary depending on flooring type and subfloor material, with detailed step-by-step instructions to avoid common challenges like inadequate fastening or improper expansion gaps. The guide also underscores the importance of professional consultation for complex projects, as incorrect installation can severely compromise both functionality and aesthetics.
Finally, the guide addresses finishing techniques, routine maintenance, and environmental impacts, providing expert tips to preserve the floor’s beauty and performance over time. It notes controversies surrounding moisture management and VOC emissions from engineered hardwood adhesives, encouraging informed decision-making to optimize both health and sustainability. By following these expert recommendations, homeowners and installers can unlock the secret to lifelong hardwood floor beauty and resilience.
Importance of Hardwood Floor Installation
Proper installation of hardwood flooring is crucial to ensure its durability, appearance, and overall value. Hardwood flooring, known for adding style, warmth, and increased home value, requires skillful nailing of the wood planks to the subfloor, a task that demands precision and expertise. Because solid hardwood can be sanded and refinished multiple times, a correctly installed floor allows homeowners to maintain its beauty for many years.
Incorrect installation can lead to issues that compromise both functionality and aesthetics. To avoid common pitfalls and achieve a flawless finish, it is recommended to engage professional flooring contractors well-versed in hardwood maintenance and installation. Proper installation not only preserves the luxurious look of hardwood but also maximizes the return on investment by maintaining the floor’s resale value.
Types of Hardwood Flooring
Hardwood flooring primarily comes in two main types: solid hardwood and engineered hardwood, each with distinct characteristics and benefits.
Solid Hardwood Flooring
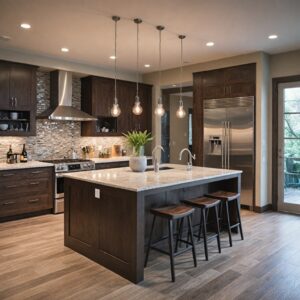
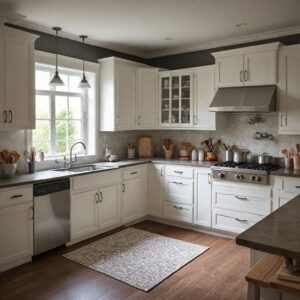
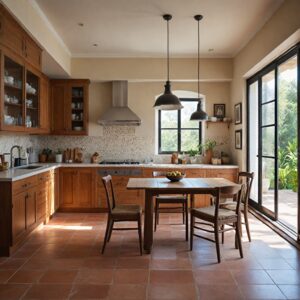
Solid hardwood flooring is made from a single piece of 100% hardwood, typically milled to around 3/4 inch thickness. These planks have tongues and grooves on opposite edges, allowing secure interlocking during installation. Solid hardwood is prized for its rich appearance that adds style and value to rooms such as living rooms, kitchens, bedrooms, and dining areas. It offers authenticity, timelessness, and durability many homeowners aspire to achieve.
One significant advantage of solid hardwood is its ability to be refinished multiple times. When scratches penetrate the finish or rejuvenation is needed, sanding and refinishing can restore its original beauty. The finish enhances shine, aesthetic appeal, durability, and simplifies maintenance. Proper subfloor preparation is essential for a successful, long-lasting installation.
Engineered Hardwood Flooring
Engineered hardwood consists of a top veneer layer of real hardwood bonded over multiple plywood or high-density fiberboard layers. This provides greater stability, making engineered hardwood less prone to warping and swelling compared to solid hardwood. It is often more economical and easier to maintain, requiring regular sweeping and occasional mopping.
Veneer layers can be produced by dry sawn, plain sliced, rotary-cut, or rift-sawn techniques. Dry sawn veneer is cut similarly to slicing bread and generally offers higher quality, while rotary-cut veneer peels the log like a potato, resulting in distinctive grain patterns. Plain sliced veneer is common in solid oak floors and provides familiar wood grain, whereas rotary-cut veneers display more random grain patterns. Thicker sliced and spliced veneers are more resilient and better suited for sanding and refinishing than thinner rotary-peeled veneers.
Engineered hardwood supports various installation methods suitable for different subfloors, making it versatile for diverse home environments. It uses less raw timber and can incorporate recycled wood materials, contributing to environmental sustainability, although adhesives used may emit volatile organic compounds (VOCs).
Preparation for Installation
Proper preparation is crucial for a successful hardwood floor installation, ensuring both aesthetic appeal and durability. The process begins by confirming that hardwood flooring and the installation site meet all necessary conditions.
Moisture control is a primary consideration. The moisture content of the wood subfloor should closely match that of the hardwood flooring, ideally within two to four percentage points depending on the flooring type. Accurate moisture measurement using a moisture meter is essential to prevent warping, buckling, or gaps caused by expansion or contraction after installation. Subfloors, whether wood or concrete, must be dry and stable; concrete slabs should be tested for moisture and only used if sufficiently dry.
Acclimation involves storing the flooring in the installation area under controlled temperature (60 to 80°F) and humidity (30 to 50%) for at least three days or until moisture content stabilizes. Tropical woods may require longer acclimation due to unique moisture absorption characteristics. This minimizes post-installation issues by allowing wood to adjust to ambient conditions.
Subfloor preparation includes ensuring wood subfloors are at least 3/4-inch thick plywood or OSB, securely fastened to joists. Sometimes, an additional plywood subfloor may be needed to reduce squeaks and create an even surface. Underlayments rated as vapor barriers are recommended beneath hardwood to protect against humidity from basements or crawlspaces. For concrete subfloors, proper surface prep and recommended underlayments or adhesives are critical.
Planning layout before installation helps achieve a professional look. Measure the room carefully, decide floorboard direction, and perform a trial layout using product from several cartons to ensure color and grain consistency. Inspect materials prior to installation to confirm satisfaction, as installation constitutes acceptance of product and site conditions.
Maintaining a climate-controlled environment for at least two weeks prior to delivery and throughout installation helps stabilize subfloor and hardwood flooring, reducing moisture-related risks.
Adhering to these preparation steps—moisture control, acclimation, subfloor readiness, and careful planning—greatly improves the success and longevity of hardwood floor installations.
Installation Methods
Several installation methods suit different wood types, subfloor materials, and homeowner preferences: nail-down, staple-down, glue-down, and click-lock (floating).
Nail-down is traditional and common for solid hardwood, securing boards to plywood subfloors with nails or staples for a permanent, stable surface. This method offers durability and nearly invisible fastening. Staple-down is similar but uses staples and also requires plywood subfloors. Both methods generally require professional assistance for best results.
Click-lock (floating) installation is common for engineered hardwood. Panels interlock without adhesives or nails, which helps block moisture and suits subfloors like cement, tile, or radiant heating systems. Floating installations often incorporate an underlayment to maintain expansion gaps.
Glue-down installation is primarily used for engineered hardwood and parquet, not solid hardwood. Adhesive bonding provides excellent soundproofing and eliminates gaps between floor and subfloor. It is effective for 5/16-inch solid hardwood on concrete, but manufacturer guidelines should be followed.
The installation method choice depends on wood flooring type, subfloor material, budget, and lifestyle. Proper acclimation and moisture checks are critical preparatory steps regardless of method.
For heavy-duty installations or renovations, removing existing flooring and trim and consulting professionals is advisable to choose the right materials and techniques, ensuring durability and structural soundness. Always refer to manufacturer instructions and consider professional installation when unsure.
Tools and Materials Needed
Successful hardwood floor installation requires appropriate tools and materials. Essential hand tools include measuring tapes, saws, hammers, pry bars, nailers or staplers, tapping blocks, spacers, and levels. Selecting the right wood type and cut—plain-sawn, quarter-sawn, or rift-sawn—affects both appearance and floor stability.
Protective layers such as cardboard sheets cut to fit around walls and hallways, with seams taped together, help safeguard newly installed floors. A layer of roll paper beneath the cardboard further prevents dirt, keeping floors virtually untouched during and after installation.
Step-by-Step Installation Process
Installing hardwood floors requires planning, the right tools, and attention to detail for a lasting result.
Installing the First Row
Begin along the longest, straightest wall, ideally with a long piece of hardwood to establish a foundation. Align the first row snugly against wall spacers and secure in place. For nail-down or staple-down methods, drive nails or staples into floor joists, spaced about 16 inches on center. Place nails 1–2 inches from board ends and between joists for optimal holding.
Installing Subsequent Rows
Install remaining rows, staggering end joints by at least 6 inches for stability and appearance. Cut boards as needed, especially near walls. Use face nailing or specialized tools in tight spaces for a tight fit. Maintain straight edges using pilot holes and countersinking nails to keep surfaces smooth.
Preparation and Planning
Select hardwood suited for home conditions like humidity and subfloor type. Remove existing flooring, baseboards, trim, molding, and doors to create a clean workspace. Clean subfloor by sweeping, vacuuming, and scraping residue for a flat, adherent surface. Verify wood subfloor thickness (3/4-inch plywood or OSB), fastening, and absence of squeaks; fasten loose areas. Check for uneven spots exceeding 3/16 inch and address by sanding or grinding.
Acclimation and Layout
Acclimate hardwood by allowing adjustment to room humidity and temperature to prevent expansion or contraction issues. Plan layout by measuring room and deciding floorboard direction, often perpendicular to joists for stability or parallel to longest wall or natural light for aesthetics. Maintain a 3/4-inch expansion gap around perimeter with spacers.
Handling Obstacles and Special Areas
Measure and mark hardwood for vents, doorways, and irregular areas before cutting to ensure a clean fit. Use appropriate cutting tools and techniques.
Finishing Touches
After installing all boards, remove spacers to reveal expansion gaps and reinstall baseboards and trim to cover gaps, allowing natural wood movement. For unfinished floors, sand and apply multiple finish coats, sanding lightly between coats for durability and appearance.
Following these steps ensures a structurally sound, visually appealing, and long-lasting installation. Consult professionals if uncertain.
Common Installation Challenges and Solutions
Proper installation ensures aesthetic appeal and durability. Common challenges can be mitigated with understanding and care.
Moisture and Acclimation Issues
Managing moisture content is vital. Hardwood and subfloor moisture levels should be compatible to prevent warping or gaps. Use moisture meters to ensure levels are within 2-4% before installation. Acclimation involves monitoring moisture content in controlled environments (30-50% humidity, 60-80°F). Poor acclimation can cause post-installation issues.
Subfloor Preparation
A stable subfloor is essential. Wood subfloors should be at least 3/4-inch plywood or OSB and securely fastened to joists. Crawlspaces require ventilation and clearance (18 inches earth to joists, 12 inches to beams) to avoid moisture problems. Uneven subfloors benefit from underlayments like rubber, cork, foam, or felt for stability, insulation, and moisture protection.
Installation Techniques and Expansion Gaps
Start the first row aligned with drywall. Secure planks properly, avoiding reliance on snug fits alone to prevent movement or failure. Leave about 3/4-inch expansion gaps around walls and between sections to allow wood movement and prevent buckling. Gaps are covered by baseboards, shoe mouldings, or transition strips.
Avoiding Common Mistakes
Errors often arise from rushing or neglecting prep steps like acclimation, subfloor prep, fastening, or expansion gaps. Trial layouts using product from multiple cartons and collaborative reviews help identify appearance or quality issues. Professional guidance ensures appropriate materials, methods, and conditions for the specific flooring and site. Careful planning and technique unlock lifelong hardwood floor beauty and durability.
Finishing Techniques During and After Installation
Finishing techniques ensure hardwood floor durability and aesthetic appeal. Reapplying finish every few years protects and refreshes wood.
During installation, carefully measure and mark openings like vents or doorways for precise cuts. After installation, sanding and finishing provide a polished look.
Sanding is key, typically done three times with progressively finer sandpaper to create a smooth surface. Light sanding may suffice for paneling or stair rails, but floors require thorough sanding. Sand between finish coats to ensure adhesion and appearance, following manufacturer instructions.
Clean floors before finishing using a push broom wrapped with a lightly dampened lint-free cloth to remove dust without water damage. Seal ends and edges near moisture-exposed surfaces (exterior doorways, tile floors) to prevent water infiltration.
Post-installation maintenance includes immediate spill cleanup with a soft, dry or slightly damp cloth, wiping from edges toward the center to avoid damage.
These techniques help floors resist scratches, dents, and water damage, enhancing customer satisfaction and installation value.
Maintenance Tips for Longevity
Proper care preserves hardwood floor beauty and durability over time. Establish consistent cleaning routines to maintain floors with minimal effort.
Regular dusting or vacuuming removes grit and debris that can scratch and dull finishes. Sweep daily or as needed; deep clean weekly using trusted hardwood floor cleaners, avoiding generic or homemade sprays. Avoid excessive water; use lightly dampened lint-free cloths or mops. Promptly blot spills with dry or slightly damp cloths from edges inward to prevent stains and moisture penetration.
Polishing every 2-4 months with water-based or urethane-based polishes restores luster and protects surfaces by filling micro-scratches without wax buildup or harmful residues. Professional repair or refinishing is advised for deep scratches, gouges, or water damage to maintain integrity and appearance.
Avoid harsh acidic cleaners like vinegar or lemon juice that damage finishes. Prevent standing water and use protective coverings during renovations to extend lifespan. Following these guidelines ensures hardwood floors remain a long-lasting, cost-effective option.
Expert Tips for Ensuring Lifelong Beauty
Proper installation and maintenance preserve hardwood floors’ beauty and durability. Whether installing or maintaining, expert strategies ensure lasting excellence.
Installation Preparation and Planning
Secure squeaky subfloors with screws before hardwood installation to prevent noise and instability. Plan layouts accurately by measuring rooms and deciding floorboard direction for professional results. Measure and cut precisely around obstacles like vents and doorways for seamless fit.
Acclimation of Hardwood Materials
Acclimate flooring in the installation room for at least
Environmental Considerations
Engineered hardwood flooring offers several environmental advantages compared to solid hardwood. One significant benefit is that it utilizes less of the tree, as the core layers can be made from smaller wood pieces or recycled wood materials, reducing overall wood consumption. This makes engineered hardwood a more resource-efficient option for homeowners concerned about sustainability.
However, the manufacturing process of engineered hardwood involves the use of adhesives, glues, and resins, which can lead to the emission of volatile organic compounds (VOCs). These emissions may impact indoor air quality, so it is important for consumers to consider products that have low VOC levels or carry certifications verifying environmentally responsible practices.
Some manufacturers have achieved independent sustainability certifications, which verify the use of sustainable wood sources and eco-friendly production methods. Such certifications provide assurance to consumers looking to minimize their environmental footprint while enjoying the aesthetic and functional benefits of hardwood flooring.
The content is provided by Sierra Knightley, Home Upgrade News